When I saw the video below , I am so tempted to try it out!
*Zzang zang!*

This is the packaging. It has 3 products inside the box.
Left: (1) Deep Pore Sebum Softener
Center: (2) Blackhead Removal Activated Carbon Mask
Right: (3) Skin Clarifying Pore Treatment Essence

This is the instruction on the box, but there is another set of instruction inside the box. A more detailed one but in chinese. I will roughly translated the instruction and have some photos along with it!
WARNING:
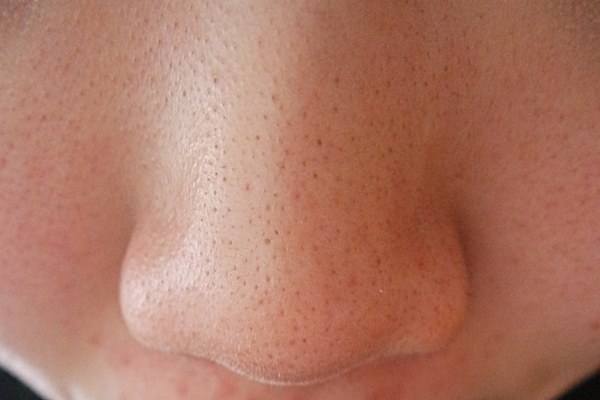
SUPER GROSS ZOOM-IN PHOTO OF MY OVERCROWDED-WITH-BLACKHEAD NOSE!
-----------------------------
----------------------
-------------
-------
---
-------
-------------
----------------------
-----------------------------
Last Warning... ... ...
... ... ... ... ...
Last Warning... ... ...
... ... ... ... ...
Step 1:
Cleanse your face well. After that, put a warm towel on top of the area you wanted to use the mask on for 2 minutes. This step is to let your pores open up.


WOW! Just look at the giant pores.. Stubborn blackhead everywhere! Remember I once mention that "blackheads are jumping out of my nose and chin", I am not joking.
Step 2:
Use (1) Deep Pore Sebum Softener. Apply it onto the area you wish to focus on. Let it rest on that area for 8mins before rinsing it off. It helps to soften the skin and open up the pores. 
Step 3:
Use (2) Blackhead Removal Activated Carbon Mask. Apply appropriate amount not too thick, not too thin on areas that you used (1) on and wait for it to dry. It takes about 15mins to 45mins (for me). After it dried up, peel it from the bottom to the top. This ↑direction. 

... ... ...

Personally, I don't think it pull out my blackheads/whiteheads. I know my nose is not that clean. Just look at Step 1's photo. The pores are filled with dirty stuffs!
Step 4:
Use (3) Skin Clarifying Pore Treatment Essence. Again, pat an appropriate amount on areas that you used (2) on GENTLY. 
To be honest, this photo is taken with beauty shot accidentally. But in real life, I am super disappointed with the results that I decided to give a try again. I repeated the process again and this time I applied a thicker layer of the mask this time round and...

... VIOLA!

This is the result I am expecting to rip out at the end of the day. Just look at the whitehead stuck there. Only one word to describe the feeling, SHIOK!

The AFTER!
Conclusion:

I had prepared a 'Before' and 'After' for you all to compare. Okay... My results is not as impressive as those video on youtube. Their result is really so good and obvious. For mine, I need to take a macro photo of my nose and zoom in to notice the difference. You can see the blackhead slightly lesser that the before but... pictures speaks a thousand words.
The product perform as it promised. It did remove blackheads but not totally. I have stubborn blackhead, maybe that's why the product didn't perform as well. :S Will post another update about this product after one or two months?. I am currently trying out some blackhead/whitehead

I think you have to use a little thicker for maximum results. By the way, nice review :)
ReplyDeleteThe mistake you made is that you have to rinse off the sebum softener first, before you put on the blackhead mask
ReplyDeleteyou'll get much better results if you try that!
Hi Florence, I did rinse off. Maybe my blackhead are just too stubborn. :)
DeleteI heard for best results, not to rinse the sebum solution and apply the mask after the 8mins
ReplyDelete