Wednesday, September 16, 2015

I wanna...

I think this post is pretty random and shortest post ever, I can't decide whether should I continue with my work or start on my school assignment both are due tomorrow. I am totally aware that precious time are slipping away, but I just want to vent express my feeling somehow or other.

Recently, I notice that as a full-time working adult and part-time student, I fail at time management terribly like now! Overtime, project from both work and school and assignments are really draining me out. There are so many things I really want to do, like travelling... But I don't have enough leave for me as I took most of them to prepare for my exam. ☹

In order to remind myself of these goals and wants, I decided to add a column on the right of this blog create a page just for it sorry... I have too many wants!. Do look out for that page!

Saturday, September 12, 2015

Review: Banana Tree SG

Banana Tree is one of the must-go café for me in Seoul, South Korea. Sadly, I don't have a chance to visit them the last time I was there two years ago. When they open an outlet along Keong Siak Road, I know I must visit this place at least once!

Finally, managed to drag X with me last Sunday evening to try this super photogenic place.


Banana Tree Singapore
26 Keong Saik Road
Singapore 089133


Thanks to the korean lady who decided to bring the brand over to Singapore!


Red Bean Pot Bing Soo ($8.50 -Mini)
I thought that they offer some choices for the 'soil' like you can choose either crushed Oreo cookies or red bean. When I saw the photos on instagram, I just assume they are all red bean lovers. But when I saw their menu, they only have red bean for bing soo. It is a major turn off for me la because my stomach is really weak towards beans especially red bean and nutsBut at the same time, I really want to try it.

Dilemmmmmma~  

Fake flowers, malt ice-cream, almonds, red beans, soy bean powder and shaved ice. Just look at the picture above, I would give them 100/100 for presentation because it is super chio pretty! X feel that the shaved ice can be smoother but to me, I like it. Those ice flakes ↓ is like those we had in ice kachang. Atas version of Ice Kachang.

Hmmm.. Before I start writing this post, I went to search more pictures online and I notice they changed the ingredients in their 'pot'. Some photos I saw is using fruits and some is using nuts or almond like ours. Personally, I would prefer it with fruits, but adding almonds also add some crunch to it.
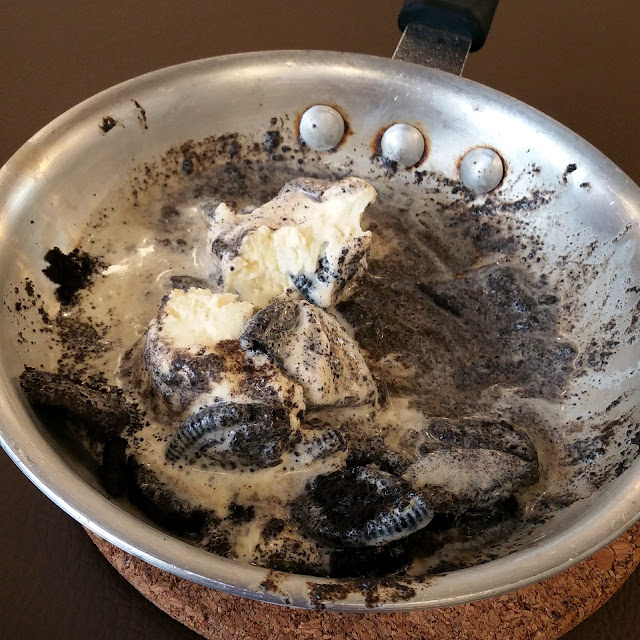

Oreo Bomb ($12)
All Oreo lovers out there, this is good! X and I love it so much Me mad love~. It is a simple dish but my god, it is pure genius! You can replicate this dish  at home. Just crush some Oreos, heated it up and toss in two balls of ice-cream. Viola! Your very own Oreo Bomb. When they are mashed together, it is like handmade cookie and cream ice-cream!


How to get there
Located walking distance away from 3 MRT station Tanjong Pager MRT, Chinatown MRT and Outram Park MRT. It really depends on how you want to get there, I will attached the direction from Outram Park MRT.
 
Image cr: onemap.sg

Sunday, September 6, 2015

Review: My Scheming Blackhead Removal Activated Carbon Mask Set

Hello, I will be giving away 1 set of this mask! Do click on here for more information. 

When I saw the video below , I am so tempted to try it out!
After some online searching, I found out this is a very popular blackhead removal product in Taiwan and of course, my favourite S.H.E member is the celebrity on the box! Fangirl mode Anyway, this product is not available in Singapore yet but... I can't wait to get my hands on it! So I decided to pre-order my set. FYI, I bought it at around $13 without normal postage fee. I saw on Carousell and Qoo10, this set cost around over $15.

*Zzang zang!*
This is the packaging. It has 3 products inside the box. 
Left: (1) Deep Pore Sebum Softener 
Center: (2) Blackhead Removal Activated Carbon Mask 
Right: (3) Skin Clarifying Pore Treatment Essence

 
This is the instruction on the box, but there is another set of instruction inside the box. A more detailed one but in chinese. I will roughly translated the instruction and have some photos along with it!

WARNING: 
SUPER GROSS ZOOM-IN PHOTO OF MY OVERCROWDED-WITH-BLACKHEAD NOSE!
-----------------------------
----------------------
-------------
-------

---

-------
-------------
----------------------
-----------------------------

Last Warning... ... ...

... ... ... ... ...

Oh my. You are so brave, my dear reader. Anyway you have been warned, so let's get started with this post.

Step 1: 
Cleanse your face well. After that, put a warm towel on top of the area you wanted to use the mask on for 2 minutes. This step is to let your pores open up. 
 WOW! Just look at the giant pores.. Stubborn blackhead everywhere! Remember I once mention that "blackheads are jumping out of my nose and chin", I am not joking.

Step 2: 
Use (1) Deep Pore Sebum Softener. Apply it onto the area you wish to focus on. Let it rest on that area for 8mins before rinsing it off. It helps to soften the skin and open up the pores.

Step 3: 
Use (2) Blackhead Removal Activated Carbon Mask. Apply appropriate amount not too thick, not too thin on areas that you used (1) on and wait for it to dry. It takes about 15mins to 45mins (for me). After it dried up, peel it from the bottom to the top. This ↑direction. 


... ... ...
 

Personally, I don't think it pull out my blackheads/whiteheads. I know my nose is not that clean. Just look at Step 1's photo. The pores are filled with dirty stuffs!
 
Step 4: 
Use (3) Skin Clarifying Pore Treatment Essence. Again, pat an appropriate amount on areas that you used (2) on GENTLY.  
 
To be honest, this photo is taken with beauty shot accidentally. But in real life, I am super disappointed with the results that I decided to give a try again. I repeated the process again and this time I applied a thicker layer of the mask this time round and...
 

... VIOLA!

This is the result I am expecting to rip out at the end of the day. Just look at the whitehead stuck there. Only one word to describe the feeling, SHIOK!

 
The AFTER!

Conclusion: 

I had prepared a 'Before' and 'After' for you all to compare. Okay... My results is not as impressive as those video on youtube. Their result is really so good and obvious. For mine, I need to take a macro photo of my nose and zoom in to notice the difference. You can see the blackhead slightly lesser that the before but... pictures speaks a thousand words.

The product perform as it promised. It did remove blackheads but not totally. I have stubborn blackhead, maybe that's why the product didn't perform as well. :S Will post another update about this product after one or two months?. I am currently trying out some blackhead/whitehead remover softener that promise result.